How To File KRA Nil Returns: Step By Step Using Your Smartphone or Computer
Filing KRA nil returns is simple and straight forward. Anyone who hold a KRA pin number and has no income source is eligible for filing nil returns. This article will guide you on how you can file your nil returns and get the acknowledgment slip. The step by step process will help you file your returns online with no issue either using your smartphone or on a laptop computer.
Remember you have a tax obligation to declare your returns and each your all Kenyans are supposed to file the returns for the previous year between the first day of January to the last day of June.
But first, which methods are available for one to file nil returns?
Basically there are three ways Kenyans can use to file Nil returns and. The first method is to visit the nearest KRA office with your ID number and KRA number and you will get help on this. The attendants at the KRA offices will fill the returns for you. The second method to file nil returns is to visit the KRA desk at the nearest Huduma Centre. You will also be required to have your ID and your KRA numbe rto be able to file your returns.
The third and the best method to file nil returns in Kenya is doing it online by yourself or in a cyber cafe’. If you have a smartphone connected to the internet, you can easily log into the KRA itax portal and file nil returns.

Personally, I have always filed returns for myself and even for my family members over years. That’s why I want to share the process with you so that you can as well do it all by your self by following these simple steps:
How to File Nil Returns Using a Smartphone
Step 1: Open your mobile browser with your smartphone
You will need to have your data on to be able to connect to the internet.
Step 2: Log into KRA iTax portal
To achieve this you need to use the correct web URL which is https://itax.kra.go.ke/KRA-Portal. This will lead you tho the KRA itax official website.
Step 3: Enter your KRA PIN number and click on continue.
This step will only be successfuly if you had migrated your KRA PIN to the new itax system. If you acquired your KRA PIN after 2015, then your KRA PIN is already intergrated with the itax platform. However, if you are a holder of the old KRA PIN number, you will be prompted to migrated it to the itax system. To do so, just follow the prompts and enter your email address to receive the password. You will be required to log afresh using the system generated password and set one that you can remember.
Step 4: Enter your itax online portal password
To log in, you will now be required to enter your password and complete the simple Maths test. This is to verify that you are a human being. In case you forgot your password, you can click on the forgot password button to reset it. A new password will be sent to your email. Use this as a starter to be able to set up anew one.
Step 5: Log Into your account
Once you log in to your account, you will be presented with many options on what you can do among them filing your returns, changing your basic information and even generating a Tax Compliance Certificate.
Step 6: Click On Returns
To file your nil returns, just click on the returns button to see the available options

Step 7: Select The ‘File Nil Returns’ Option
This is the option you should select if you intent to file nil returns. If you do not fall under this category, then select the most appropriate one that is applicable to you.
Step 8: Select the year you want to declare your tax
Here you will select the previous year as the period of tax declaration. This previous year will be from 1st date of January to 30th of December last year. If you had just obtained or applied for the KRA PIN recently the year before. the you will declare your tax from the date and month you obtained the KRA PIN number.
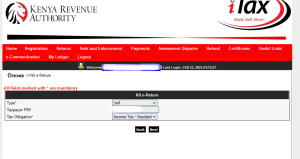
Step 9: Select your tax type and Obligation
Under the tax type, select ‘self‘ and under the tax obligation, choose the ‘Income Tax-Individual Resident‘ option then click okay.

Step 10: Declare and agree to the terms then submit
You will be prompted to agree that you fall under the Income tax- individual. You will be required to consent that you did not do business in the period you wish to declare your tax and that you you qualify to file nil return. Click on OK to submit your entry.

Step 11: Download and Print Your Receipt
The last step is to download and print or save the acknowledgement slip. This is the final step and you will have completed the process successfully. You can the log out.
How to File Nil Tax Returns Using A Laptop Computer
To file your yearly tax returns on a laptop or a computer, follow the below steps:
Step 1: Open your computer browser with your laptop or computer
Step 2: Log into KRA iTax portal
Step 3: Enter your KRA PIN number and click on continue
Step 4: Enter your itax online portal password
Step 5: Log Into your account
Step 6: Point your computer mouse On Returns option to highlight categories under it
Step 7: Select The ‘File Nil Returns’ Option
Step 8: Select the year you want to declare your tax
Step 9: Select your tax type and Obligation
Step 10: Declare and agree to the terms then submit
Step 11: Download and Print Your Receipt
Read:Top 10 Internet Service Providers In Kenya


